
Control Which Email Address Zendesk Sends From
Zendesk’s default behavior sends emails from whichever address received the ticket, or your default support address. But what if you want to control which address emails come from based on ticket properties—like sending provider-related tickets from providers@ and billing tickets from billing@?
Why you might need this:
- Multiple teams working in Zendesk with different customer-facing workflows
- IT restricts you to a subdomain (you can receive on domain.com but must send from sub.domain.com)
- You want outbound/proactive emails to come from a specific address
The Obvious Solution (and the limitations)
Section titled “The Obvious Solution (and the limitations)”There are two Zendesk apps for this. The free one, “Select an Address” (Install instructions | app link), maps email addresses to the user’s group rather than the ticket’s group, which breaks many workflows. There’s also a paid app called “Reply From” ($1/agent/month), created by a third party developer.
A better approach
Section titled “A better approach”The solution below uses webhooks to set the outbound address via the Zendesk API. It’s more scalable, provides a cleaner agent experience, and has no ongoing costs. Here’s what we’ll set up:
- Setting up your email addresses
- Creating custom ticket fields
- Creating a Webhook
- Creating triggers
- Notification triggers
- Email template cleanup
Step 1: Add your desired email address(es) in Support Addresses
Section titled “Step 1: Add your desired email address(es) in Support Addresses”/admin/channels/talk_and_email/email/support-addresses
I’ll assume that you have this setup, but it’s a good reminder to make sure they’re working and you have all of the addresses that you want to use. I won’t go over this setup to connect your own domain because it has an extra bit of complexity. It is very easy to add a Zendesk email to test the setup.
Please do ensure they are valid/verified (SPF, DNS, etc.) email addresses.
For now, we’ll use the following address that you setup: help@company.zendesk.com
Step 2: Create Custom Ticket Fields
Section titled “Step 2: Create Custom Ticket Fields”/admin/objects-rules/tickets/ticket-fields
The typical way that Zendesk works is that there’s a default email address for your entire brand. This works well if you only want to use one address to send outbound email. It fails if you want to send proactive emails from a specific email address within your Zendesk setup. Inbound emails automatically get set based on the address it was sent to.
The fields you create will only ever get set from triggers that we’ll set up later, and they are not affected by inbound emails. If you want to set a different Send from Address than the inbound email address, you can do that with other triggers, but that’s not covered here.
Create two custom ticket fields
Section titled “Create two custom ticket fields”1) Reply-From-Address: this will indicate which email address you want to use to send the email notification.
Create a custom dropdown ticket field with options like:
- help@company.zendesk.com
- support@company.com
- hello@company.com
- success@company.com
- legal@company.com
Select the default value that you want to use when this gets set.
The Field ID is key, take note of it for the setup. We’ll use the example Field ID of 11111111111 in this tutorial and the example field name is EmailAddress
2) Recipient Set:
- Add a checkbox field (true/false) to indicate if the recipient is set.
- Set the default value to False.
- Tags =
recipient-set- This says optional, but it is required for your triggers to work correctly
This field is the key to your triggers. This Field ID is 22222222222
Step 3: Create a Webhook & API Token
Section titled “Step 3: Create a Webhook & API Token”/admin/apps-integrations/webhooks/webhooks
/admin/apps-integrations/apis/api-tokens
You’ll use a webhook that fires from a trigger to update the ticket’s “recipient” property. In other words, this is the same as setting the outbound email address.
Here’s the key part: The recipient property on a ticket controls which address Zendesk sends from.
You will be calling the Zendesk API from inside of Zendesk via a trigger and this is necessary because Zendesk doesn’t let you set the outbound address directly in trigger actions. You need a webhook that calls the Zendesk API to update the ticket.
Create an API Token:
Section titled “Create an API Token:”- Follow the steps to create the token
- Tips:
- Make sure to save it in a secure place, like a password manager
- Do not share this publicly
- API tokens are auto-generated passwords that team members use together with their email addresses to authenticate API requests.
- Let’s assume your API token is
445566(it will be much longer and complicated)
Create a webhook:
Section titled “Create a webhook:”- Name - make it something specific because you’ll select it from a list later on. I’ll call mine
SetOutboundEmail - Select Trigger or Automation
- Endpoint URL:
https://yoursubdomain.zendesk.com/api/v2/tickets/{{ticket.id}}.json- To customize this URL, replace “yoursubdomain” and leave everything else the same
- Request method: PUT
- Request format: JSON
- Basic Authentication: API token (your Zendesk admin email + API token)
- Username:
email@company.com/token(e.g.,email@company.com/445566) - Password: your API token
- Username:
- Test the webhook to make sure you get a success message
Step 4: Create Reply-From Trigger
Section titled “Step 4: Create Reply-From Trigger”/admin/objects-rules/rules/triggers
The first trigger is one that sets the fields: Reply-From-Address and Recipient-Set. In the next step, I’ll outline the trigger to send the email notification.
These triggers can get messy because they can not have the same conditions or the trigger will not work successfully because the first trigger fires. The first trigger fires upon an agent creating a ticket, and the notification trigger fires when the recipient is set AND the checkbox field that you created is checked (aka true) when the webhook runs.
This trigger sets the ticket field values called Reply-From-Address and the field Recipient-Set to true.
Conditions
Section titled “Conditions”- Ticket is created
- Current user is agent
If you want to create multiple versions of this trigger for different outbound addresses, set more criteria such as: user, groups, etc.
Actions
Section titled “Actions”- Notify by active webhook → WebHookName (SetOutboundEmail)
- This automatically pulls up the webhook settings that you previously configured
- JSON - it’s time to get (slightly) technical, you can do it!
- What we’re essentially going to say to Zendesk’s API, via JSON, is that we want to set certain ticket field conditions
- We will set the recipient email address
- Set ticket field recipient-set = true (this will automatically tag the conversation)
- What we’re essentially going to say to Zendesk’s API, via JSON, is that we want to set certain ticket field conditions
Here’s the JSON to set the recipient to the default value of the field Reply-From-Address:
Section titled “Here’s the JSON to set the recipient to the default value of the field Reply-From-Address:”{ "ticket": { "recipient": "{{ticket.ticket_field_option_title_11111111111}}", "custom_fields": [ { "id": 22222222222, "value": true } ] }}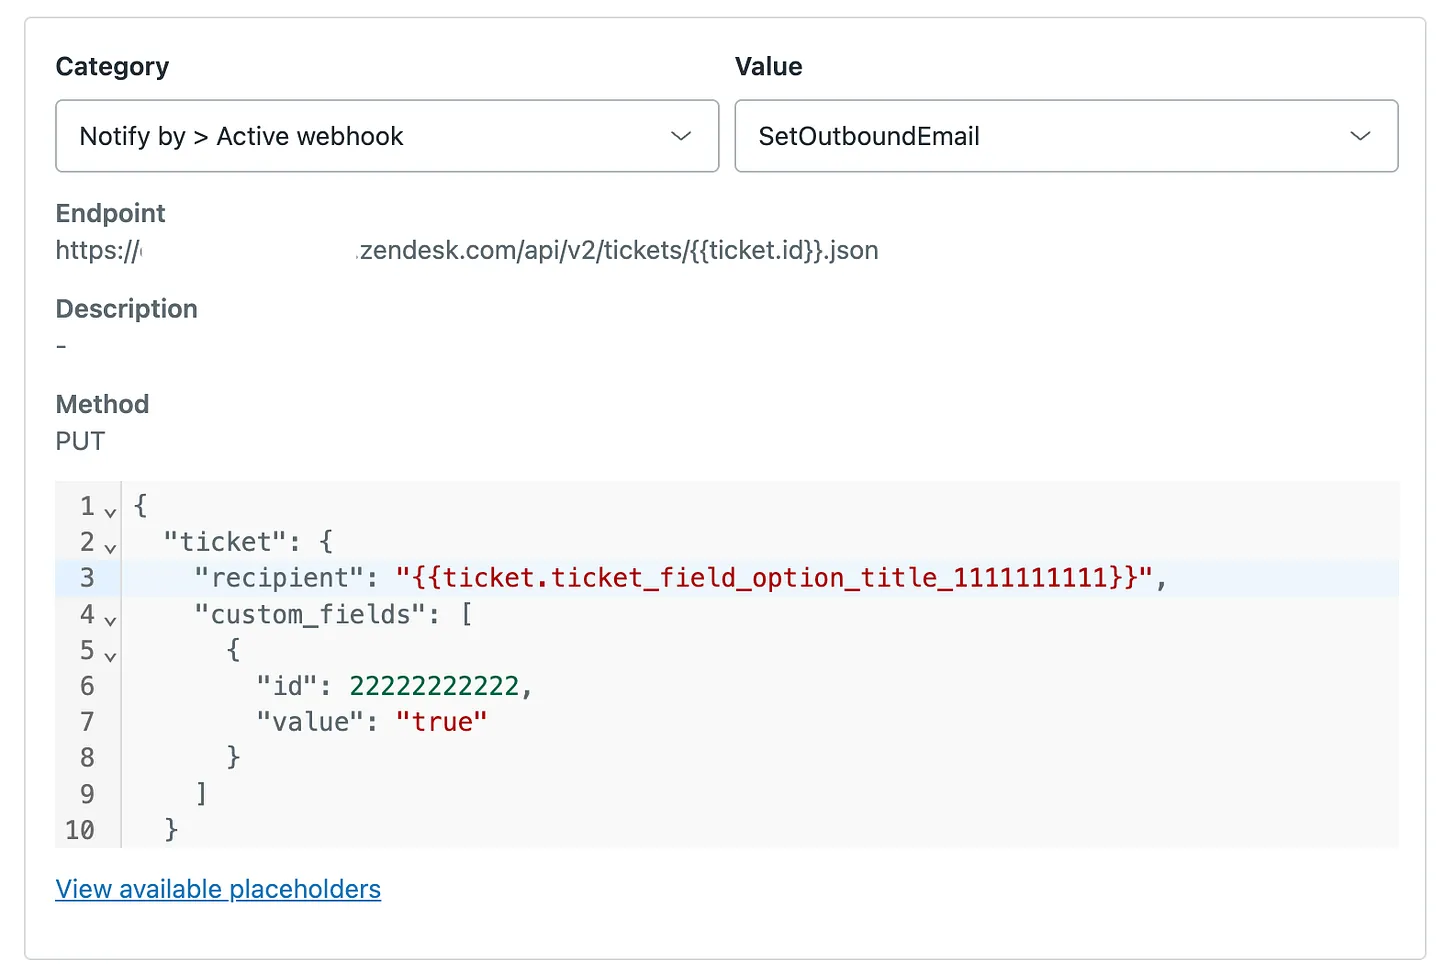
Remember, the ticket Field IDs come into play here, so the 11111111111 and 22222222222 values are unique to the fields you created. They will be obscure numbers though, like 45367386491028 - which you can find in the URL of the field:
https://company.zendesk.com/admin/objects-rules/tickets/ticket-fields/45367386491028
Here’s the JSON to set the recipient to a specific value, such as legal@company.com:
Section titled “Here’s the JSON to set the recipient to a specific value, such as legal@company.com:”(It needs to be an email address that you have already configured). This is a way to force the email recipient field, and is easier to understand exactly what value it’s setting.
{ "ticket": { "recipient": "legal@company.com", "custom_fields": [ { "id": 22222222222, "value": true } ] }}Check if the recipient field is set
Section titled “Check if the recipient field is set”You would think that you can just open a Zendesk ticket and see the recipient field, but that’s not really the case. While you can see that it was set in the ticket history, you can do something much more fun: use the Zendesk API to see that value. It’s actually pretty awesome, try it out!
- Open Terminal on a Mac or Command Prompt/PowerShell (Windows)
- Run this command, replacing your Email, API, company name, and ticket ID:
curl -u "EMAIL@company.com/token:APITOKEN" \ https://COMPANY.zendesk.com/api/v2/tickets/TICKETID.json | jq '.ticket.recipient'- The request will return the
ticket.recipientfield value- You will see some statistics about the curl request, and it should show you the value that’s set on the ticket in quotes, like
"help@company.com" - You can try this out on any Ticket ID
- If you want more information about the ticket, like subject, you can add more values that are comma separated:
'.ticket.recipient, .ticket.subject'
- You will see some statistics about the curl request, and it should show you the value that’s set on the ticket in quotes, like
Step 5: Create Notification Trigger
Section titled “Step 5: Create Notification Trigger”This trigger is much more straightforward. Here is the Condition and the Actions:
Condition
Section titled “Condition”- Ticket Tag contains
recipient-set
Action
Section titled “Action”- Notify User by Email - Setup with the content you want
- Ticket – Remove Tag
recipient-set- I take this step so that this rule only ever fires one time. Future email notifications to a customer should be handled with your other notification triggers.
IMPORTANT: I’m sure that you already have notification triggers in place, so please make sure you run through your test scenarios. For example, create new inbound tickets, outbound tickets, replies, etc. and make sure this notification trigger doesn’t duplicate or run unexpectedly.
Additional Notification Trigger
Section titled “Additional Notification Trigger”When you continue to reply to a customer, you will want email notifications to be sent. Here’s a trigger for that. Also, these should continue to be sent from the same email address, which is the entire point of this whole exercise :)
Conditions:
- Ticket is updated
- Comment is public
- User is agent
Actions:
- Notify User by Email
- Requester or Requester and CC
Step 6: Make Your Emails Pretty
Section titled “Step 6: Make Your Emails Pretty”/admin/channels/talk_and_email/email/email-templates
If you’re just beginning your Zendesk configuration, or having issues, here’s something else to consider. If you want to adjust the email template to your own style, that’s totally possible. In my case, I removed the following HTML so that ticket information that’s not relevant for the customer doesn’t show up in the notification:
{{footer}} {{footer_link}}Wrapping Up
Section titled “Wrapping Up”That’s it. Once this is configured and tested, your outbound emails will automatically send from the right address based on ticket properties. Best of all…no agent action required, no paid apps, no ongoing costs. If you run into issues, double-check your Field IDs in the JSON and make sure your notification triggers aren’t conflicting with existing ones.
If you found this approach helpful, have questions, or want to talk about consulting for your business, please reach out—I’m always happy to talk!
Credits: I want to thank Jacob Johst Christensen, a Senior Platform & Automation Consultant @ Jabra, who helped with the original solution.